Cooking Finland is on Facebook! Click here. My art blog is here.

Tuesday, January 25, 2011

Apricot whipped porridge--Aprikoosi-vispipuuro


When I posted last week about vispipuuro, one of my former host sisters, Kati, said that the apricot version is really delicious.  My husband worked from home today, so it was a nice afternoon snack for us, with enough left over for the kids.  Maybe.

I looked at Beatrice Ojakangas' recipe in The Finnish Cookbook, but she added a whole cup of sugar!  This seemed excessive to me, so I consulted her recipe, but modified it to eliminate the sugar.

I sorted out the apricots from an extra-large bag of dried fruit from Sam's club, but only had a half cup, and the recipe called for a whole cup.  So I added in the dried peaches from the bag and had just enough.  Since the peaches are already not as sour as apricots, I decided to completely eliminate the added sugar by cooking the fruit in 4 cups of apple juice instead of water.  I cooked the fruit over low heat until it was so soft it broke apart when stirred.  This took about an hour.

Next, I measured how much liquid and fruit I had left, and it was just over two cups.  I added about two cups of water and about two cups of apple juice to make six cups total.  Then I brought this back to a boil and whisked in a half cup of cream of wheat (or you could use malt-o-meal).  Just like in the earlier post, I whisked this for a few minutes over medium heat until it thickened.


The thickened liquid then went into my stand mixer bowl, and I whipped it for a very, very, very long time (at least 20 minutes!).  I had a little trouble, it splattered a lot at the beginning, so I used a low speed until the chunks were broken up well, then gradually increased the speed.  I also used a splatter guard, but it splattered anyway!  Here is a photo taken after about ten minutes of whipping:


Eventually it was ok at high speed and I left it to whip, my big mistake.  When it started to get thick at the end, it started splattering everywhere, on the window, on the clean dishes in the drying rack, on the bananas laying on the counter...I won't forget this recipe soon--I'm sure I'll be finding random splatters to remind me for a long time!

This whipped porridge was even better than the one made with berries, and we didn't miss the refined sugar at all!

Monday, January 24, 2011

Karelian rice pies with egg butter--Karjalanpiirakka

The kids had a day off from school Friday, so we made karjalanpiirakka.  They are pretty time-consuming, but so delicious!  I think you could end world hunger with these, they are very filling and perfect for a cold winter day.  My kids love these so much, but before they can eat them, they have to pronounce the name correctly.  They have become experts at this!

I first learned to make these at the middle school in Jalasjärvi, Finland when I was an exchange student.  My friend Laura and I went over to the middle school to take a home economics class, it was a great idea for exchange students.

These pies can be filled in different ways, but probably the most common filling is thick rice porridge, I used whole milk and made a big pot following this recipe from my previous blog, here.  I'll also copy the relevant part:

First, I put 2 1/2 cups of (sushi or pearl) rice in a pan and briefly washed it.  Then I added 2 cups of water and boiled it for 5 minutes.  Watch it carefully while boiling, this isn't much water, and it is really easy to burn it, like I did the first time!  At this point, add 7 1/2 cups of whole milk, and cook for 45 minutes over low heat, stirring constantly.  This dish takes a lot of patience!  It is very easy to let the milk caramelize in the bottom of the pan.  

Additionally, add about a teaspoon of salt to the filling.

Next, I made the rye dough for the shell.  In my stand mixer with a dough hook, I mixed 3 cups of rye flour and and 3 cups of white flour with 4 tablespoons of melted butter, 1 cup of water and 1 teaspoon of salt.  This can also be mixed by hand, it makes a very stiff dough, similar in texture to pasta dough.


After the dough was mixed well, it formed a ball like this.  I used my old rolling pin from Finland to roll out very thin round shapes, the shape of this rolling pin is perfect for rolling circles.  The "bread scraper" as we call it, here at the side, is also really handy when working with dough, we use it to cut the dough and also to move the finished pastries.  It is also handy to scrape the counter or bread board for cleanup.


First I divided the dough into similar-sized pieces, about 1 inch in diameter each.  These are a lot easier to roll out if you first roll each piece into a ball and pat it flat before using the rolling pin.


After rolling the piece into a very thin circular (slightly oval) shape, I put a couple of tablespoons of the rice filling in the middle, then crimped up the edges.  These are a lot of work, but fortunately my daughter decided to do most of the rolling and filling!


Preheat the oven to 450 Fahrenheit.  Move the pastries to a cookie sheet, I like to cook them on parchment for easy clean-up.  Melt 2 tablespoons of butter and add to 1/2 cup hot milk to baste them with.  Baste the pastries again after they have baked about 10 minutes, then let them bake 5 more minutes.


Egg butter is the traditional topping for karjalanpiirakka.  The original recipe that I have uses 3 eggs and 1 cup of butter, but we use 6 eggs and 1/2 cup of butter, we just prefer it with less butter.  Boil the eggs so the middles are firm.  I boiled these 10 minutes (covered) and then let them sit covered in the hot water for another 5 minutes.  Then I peeled and smashed the eggs with a fork and smashed in the butter.  Salt to taste.


If the crusts are hard, you can wrap them in a clean towel while they are hot and the crusts will soften.  You can eat these hot or cold, but we like to warm the leftover ones.  They are terrific with the egg butter, or sometimes we just use them as the base for open-faced sandwiches.  They freeze really well, and are great to pull out if friends come over for coffee.  But I don't have any left to freeze from this really large batch...it took two days for us to eat them all.  Someday when the kids are older we may have leftovers!

Hope you enjoy these as much as we do!

Thursday, January 20, 2011

Whipped porridge--Vispipuuro


Tonight we had open-faced sandwiches with cheese and mushroom salad.  I needed something quick to make, I am almost finished with the sauna/bathroom/dressing room/closet tile floor.  The "quick re-tile project" that we started six months ago is almost completed--and we have moved a wall, moved a doorway, and completely re-framed, re-plumbed and re-wired the bathroom.  And we added a sauna!  It has been a long six months!  I've been in charge of drywall and tile these last few weeks, and have been neglecting my blogs.  Tonight I grouted most of the floor--I promise to post a photo in the next few days.

I was feeling a little guilty for spending so much time on the construction and leaving the kids on their own, so I made them a special dessert, vispipuuro.  This is basically Malt-o-meal cooked in fruit juice and then whipped.  They have been really curious about what I'm making, but I haven't let them in on the surprise yet.  I'm hoping it is a good one!

First, I took 3 1/2 cups of juice and brought it to a boil.  Traditionally, this would be lingonberry juice, but you could substitute cranberry.  Today, I used a really good pure juice that I found at Trader Joes, a blend of blueberry, cranberry and pomegranate.  The juice you use should be a little tart, for an authentic taste.  Raspberry would also be really good, I have made it with juice from wild raspberries when we visit Finland.


After the juice boils, stir in half a cup of Malt-o-meal (or cream of wheat, farina).


I cooked this for about ten minutes, stirring constantly with my whisk.  I found this plastic whisk at Ikea--it is great for use in non-stick pans.  You could cook it longer, but I think this is enough if you leave it to cool for about half an hour afterwards.


After the porridge cooled for about half an hour, I put it in my stand mixer bowl and whipped it for twenty minutes.  A stand mixer is so nice to have for projects like this.  I can just imagine women whipping it by hand with a whisk in the old days--I think this would have been a treat only for special occasions!  It changed color after only a couple of minutes, but kept getting lighter in color:


This is a really delicious and easy dessert (if you have a stand mixer!).  I served it in my Arabia Arctica dish that is part of the set we received at our wedding.  I love the simplicity of these dishes.  My husband's family gave them to us at our wedding, and my family carried the whole set back to the U.S. in their carry-on baggage!

When I tell the kids about their surprise, they will probably sprinkle sugar on the porridge in their bowls, but I'm not sure that it is necessary.  My husband insists that you should NEVER eat it with milk, but a bit of cream or whole milk tastes good with it, in my opinion.  We have to agree to disagree on that point.

Hope you enjoy this as much as we do!

Monday, January 17, 2011

Prune souffle


Prune souffle brings back good childhood memories for my husband.  He reminded me this weekend that I haven't made it in a long time.  Since he has been such a good sport with all the other recipes, especially the fish soup, I made him a treat.  Also, we are still working hard on the bathroom/sauna remodel, and I haven't had much time to cook.  This week I'll hopefully get the tile floor finished, and the project will mostly be complete.  This desert is a great one for a busy evening.

First, I soaked a package of prunes for a few hours in just enough water to cover them.  Then I added 1/4 cup (1 deciliter) of sugar, and boiled away most of the liquid.


Meanwhile, I whipped 10 egg whites and another 1/4 cup (1 deciliter) of sugar until stiff peaks formed.


I folded the prune mixture into the egg whites carefully.


Then I put the mixture into a casserole dish.  I didn't grease the dish, the egg whites cling to the sides of an ungreased dish and it gives the souffle more volume.  I baked the dish for about half an hour in an oven preheated to 350 Fahrenheit (175 Celsius).  My only mistake was putting it on the bottom rack and leaving the top rack in place--it rose up so high that it hit the top rack!  Fortunately I saw it happening and got the rack removed without destroying the souffle.


The desert was delicious, it might have been even better with whipped cream.  The kids liked it, too, but I caught the youngest sorting out the prunes.

Thursday, January 13, 2011

Fish soup made with salmon--kalakeitto (lohikeitto)


My salmon was curing in the refrigerator, but the kids wanted to eat some immediately.  All I had left was the bones and head, so we made some salmon soup. A friend just reminded me that I really need to give my host mom, Sirkka, some credit here, she makes the most incredible salmon soup!

First, I boiled the salmon in about 6 cups of water for half an hour to make broth.  Then I strained out the fish and bones.  I'll leave this picture of the fish smaller, it isn't the most appetizing...


Into the strained broth, I added a couple of cubed potatoes and boiled them for 15 minutes until they softened.  Then I put in some chopped dill and added about half a cup of light cream (I could have used a cup of whole milk instead, but this is what I had in the refrigerator).  I pulled as much fish off of the bones as possible and added it back to the soup, it would have been good if I had reserved some chunks of fish to add at this point, but I didn't have any left.  After salting to taste and adding a little white pepper, I simmered it for 10 minutes (be careful that the soup doesn't boil after you have added the milk or cream, otherwise it will separate).  The kids loved it!  The youngest kept wondering if he could find the eyeball, maybe it would bring good luck like the almond in the rice porridge at Christmas!

Cured Salmon--Gravlax--Graavilohi, first post


We really were lucky yesterday, with my morning coffee I read that one of the local stores had a very fresh shipment of whole salmon for $3.99 a pound.  I rushed over and joined the line at the fish counter.  They opened ice chest after ice chest as I waited, but I finally got my prize--actually two of them, one for now and one for the freezer.  The fish were cleaned and scaled, beautiful!

Since it is so rare for Chicagoland to find such fresh fish, I decided to fresh cure it.  You'll have to excuse my poor fillet job--I definitely need more practice.

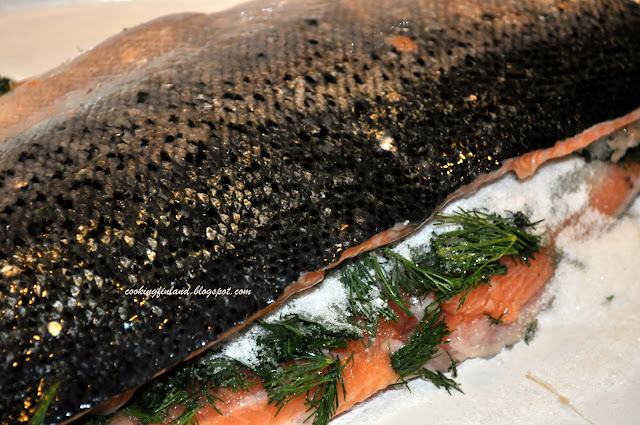
First, I cut off the head and filleted the salmon, then covered the bottom half in chopped fresh dill like this:


Next, I mixed together 1/2 cup salt and 1/2 cup sugar, with a tablespoon of white pepper and spread this over the dill.  It was a little difficult to find a pan large enough for this project, but one of my pyrex casseroles seemed to work.  Make sure the pan you use is deep enough--a LOT of liquid will come out of the fish.


The other half of the salmon went on top, then I covered the whole thing with foil.


Next, I found a heavy platter that fit down into the casserole, and weighted it down more with cans.  The foil is up a little in this photo, I fixed it before putting the whole thing in the refrigerator.


I took the fish out this morning and marinated it in the liquid that has accumulated, then flipped it over, reassembled the weights, and put it back in the refrigerator.  I will keep doing this every twelve hours for two days.  We can't wait to eat it!  In the meantime, I made fish soup with the bones and the meat that was on them.

Update:
I've been doing a little more research on the process, and it is recommended that the fish be frozen for three days either before or after curing to kill any parasites, and a lot of sites recommend curing for only one day.  Guess we'll be waiting a little longer!  Another interesting idea that I found is adding smoke flavoring to the curing fish.  This sounds really good.

Tuesday, January 11, 2011

Cabbage rolls--Kaalikääryleet


One of my husband's favorite Finnish dishes is cabbage rolls.  These are like a sweeter version of meatballs, wrapped in a cabbage leaf, which should be slightly charred on top.

I had intended to make the cabbage rolls earlier in the week, but we are still very busy with the remodeling project, we are getting a little tired of using the beautiful new sauna in the middle of an unfinished bathroom!    The project expanded a bit, we are converting a useless small hallway into a dressing area and refinishing the closet which we took half of to put in the sauna.  The walls are all back up and covered in drywall.  Now to mud the seams and tile the floor in all three areas.   But first, let me tell you about the cabbage rolls.

First, I put on a large pot of salted water to boil and took a large head of cabbage and cut out the core.  After boiling the cabbage for a few minutes, the leaves start to come off.

Keep carefully removing leaves as they loosen up, and remove them from the water when they are soft.  My pot was a little small, so I kept turning the cabbage over.


This is what the leaves looked like when they were removed from the water:


Meanwhile, I boiled a package of barley for about 45 minutes.  This recipe only uses 1 1/2 cups (measured after cooking), but we used the rest to make barley porridge.


I used the food processor to make 1/2 cup of fresh breadcrumbs, I always keep a bag of spare pieces of bread in the freezer to make breadcrumbs with.   I added 1/2 cup of whole milk, a teaspoon of salt, 1/2 teaspoon of allspice, and a pound  of ground beef.  I let this process for a couple of minutes.


Then I put the meat mixture in a bowl and added the 1 1/2 cups of cooked barley (you could also use cooked rice if you prefer).


To fill the cabbage leaves, put in a couple of tablespoons of the meat mixture, then fold the top and bottom down just a bit and roll from the side.  The same process as rolling a burrito.  Note that I have the stem going around the roll, it seemed to work better that way.


The rolls went into a heavy glass casserole which I had sprayed with cooking spray (you could also butter it).  Next I mixed a half cup of brown sugar with a couple of tablespoons of milk, and drizzled this over the top.  I used a spoon to spread it over each roll.  Then I covered the dish and baked them for 20 minutes at 400 Fahrenheit (200 Celsius).  Then I poured in enough boiling water to almost cover the rolls, removed the cover, and reduced the heat to 350 Fahrenheit and let it bake for one hour.


The rolls developed a charred layer on top, according to my husband, this is the best part.  


We ate the rolls with mashed potatoes and lingonberries from Ikea.  Or maybe I should say that most of us did.  The youngest said that "I don't like trying new things when I'm sick."  Even telling him that the filling was just like meatballs didn't get him to try them.  My husband proclaimed them a success, and I think I will just leave it at that.

Saturday, January 8, 2011

Shrimp scrambled eggs--katkarapumunakas


Tonight we were a little busy, still working on the bathroom remodel/sauna addition.  I had planned to make cabbage rolls, but just didn't have time.  Instead, I looked online for a Finnish recipe which had the ingredients that were already in the refrigerator.  I found shrimp scrambled eggs from Kotivinkki.  I followed the directions fairly closely, but substituted white onions for red ones.  I also increased the amounts by half, we have five to feed, including a teenager who is usually very hungry.

First, I chopped a large onion and two roma tomatoes.  Then I broke a dozen eggs into a large mixing bowl and added 1/4 cup of water, as in the original recipe.  Next time I will use milk instead, as I usually do.  We think scrambled eggs taste much richer with milk.


Then I soaked the precooked, frozen shrimp in water to thaw.  This just takes a few minutes, especially if you change the water often.  After they were thawed, I drained them and put them on a clean towel to dry thoroughly. 


I used a nonstick pan and a couple of tablespoons of canola oil to sauté the onions over medium heat until they were translucent.  Stir constantly and don't let them burn!  The pan I used has an eco-friendly, non-toxic nonstick, it works pretty well, but has started to show its age on the bottom.  It is from a set I found at Target a couple of years ago.  


After the onions started to get translucent, I added the tomatoes and continued cooking and stirring for a couple of minutes.  Then I added the eggs and continued to cook, stirring occasionally, until the eggs were just barely set.   Then I added the very well drained shrimp.  Salt, pepper and snipped fresh dill completed the dish.  Snipping herbs is so easy if you use kitchen shears (scissors).  


If we were in Finland, or if I had baked this week, we would be eating rye bread with butter with this dish.  Tonight we had to make do with bagels and salmon-flavored Philadelphia cream cheese, not Finnish at all, except that everyone who has visited us from Finland has liked them.  

My husband and I thoroughly enjoyed the dish.  The kids, not so much...the comments were (in descending age order):  

Kids' questions:
1.  Are there tomatoes in that?  
2.  I'm not really in the mood for eggs.  
3.  Why do the shrimp look like that?

My answers:
1.  Just a little.
2.  Put more salt on it.
3.  Because they are shrimp.

Anyway, not the kind of table banter that I was hoping for, but all kids have their days where they just aren't in the mood to eat something.  Next time I make it, I'm putting milk instead of water, a little more salt, and maybe adding something salty like Parmesan cheese or capers.

My husband was very happy this week to find Christmas soda at World Market.  Tastes kind of like very sweet Coke, if you added apple cider spice. He is enjoying it with some Italian nougat, which I also don't care for. I am waiting for his sugar headache which will be coming any time now.

As an update, we still have some mead left (kotikalja), look at how carbonated it has gotten, the bottom of the jug is rounded! The last time I opened a bottle of mead that was this carbonated, I had to clean the ceiling and walls afterward.  


Have fun cooking and keep checking back, I have to make the cabbage rolls very soon.

Thursday, January 6, 2011

Ham, shrimp and blue cheese pizza with homemade crust


This may sound like an odd combination, but it is one that my husband and I ordered many times from my apartment in Helsinki years ago.  I don't know if it is particularly Finnish or not, but it is a great reminder of simpler times for us.  Finnish pizza in general is thin crust, and seafood toppings are not unusual.  One very popular pizza is Frutti di Mare, which has tuna, shrimp, and oysters.  This may sound a little strange for Americans, but it is really delicious.  Shrimp is a pretty common pizza topping in Finland.


When we ordered this pizza in Helsinki, we actually ordered it with mushrooms, not olives.  Unfortunately, the mushrooms I bought for tonight ended up as a second portion of mushroom salad!  So tonight I substituted olives, we had a mixture of green and black olives leftover in the refrigerator.  


I like to make my own pizza dough, it is so easy.  First I microwave 2 cups (5 dl) of water for one minute, it shouldn't be hot at all, otherwise it will kill the yeast.  I put this in my stand mixer with the dough hook, and add about 1 packet of dry yeast (I buy yeast in bulk, so I usually just put a little in...) and a dash of salt.  Next, add flour (bread flour if you have it) one cup at a time with the mixer on low until the dough forms a ball and pulls away from the sides of the bowl.  I think this took about 5 cups today...it varies with the conditions in the kitchen.  It shouldn't be too stiff, but it will look like this:

Let it knead in the machine for a few minutes, then put it in a lightly oiled plastic, glass or wooden bowl to rise.  Don't leave it in the metal bowl from the mixer, bread dough doesn't rise as well in metal--it conducts heat too well.  Cover with a clean cloth and put in a warm place for up to an hour.  Today I only let it rise for half an hour, because we were in a hurry.  Thin crust pizza doesn't seem to require as long of a rise as bread dough.


While the dough was rising, I got some leftover ham chunks out of the freezer and thawed them slightly in the microwave.  The stand mixer grinder attachment grinds meat better if the meat is partially frozen.  The ham on the pizza we ordered in Helsinki was ground like this.


Next, the dough was ready to form.  I just patted it out into the oiled jelly roll pans, this amount makes two large pizzas.  My technique is to put the crusts in a cold oven, set it for 400 Fahrenheit (200 Celsius) and let the crusts rise just a bit as the oven heats up.  This also lets them cook just a little and reduces the overall cooking time.  

If we are not in the mood for pizza, sometimes we sprinkle on some rosemary and salt (or Parmesan cheese) and fully cook the dough at this point for delicious foccaccia bread.


Next, I put on some canned marinara sauce.  My kids are really particular about spaghetti/pizza sauce, and I used the one they eat the best.  You might call this "picking your battles..."  Then I sprinkled on the ham liberally, and covered the pizza with precooked peeled frozen shrimp (still frozen, not thawed, otherwise they would overcook).


Then I coated the pizza with mozzarella and dotted on the blue cheese.  This was the last of an excellent blue cheese that our neighbor Anna brought to the New Years eve party.  A smattering of olives, and the pizzas went back in the oven.  I rotated them from the top to lower rack, and cooked them for about 25 minutes.


The pizzas were a big hit, even our youngest had two big slices.  No one complained about the unusual toppings, and I am really looking forward to leftovers for lunch tomorrow!