Cooking Finland is on Facebook! Click here. My art blog is here.
Showing posts with label salmon. Show all posts

Thursday, April 7, 2011

Blinis with sour cream, caviar and smoked salmon--blinit


We are back from a very nice spring break, I haven't cooked a thing in over a week!  Actually, cooking and baking are never a chore for me, I find it really relaxing, almost meditative.  I've been wanting to make these blinis for several weeks now, they are often eaten on Fat Tuesday in Finland (also called Shrove Tuesday), according to The Finnish Cookbook by Beatrice Ojakangas.  There is another kind of small pancake more commonly eaten in Western Finland, but I'll be making those later.  Blinnis are originally a Russian dish.  (The internet seems divided on whether to spell it blini or blinni, so excuse me while I alternate the spelling in this post, just to keep the search engines happy!)

The reason I am now able to make these pancakes is that I found a wonderful antique cast iron griddle at Aid's Antique Mall over spring break.  It has the indentations to make Scandinavian pancakes, I brought a non-stick pan back from Finland a couple of years ago, but it is so light-weight that I never use it.  This cast iron pan is worth the extra expense, it is very heavy and cooks beautifully.

Here is the ingredient list that I used, I made a few changes to the one in the recipe book:

one package dry yeast (2 1/4 teaspoons)
2 cups lukewarm milk (4 3/4 dl)
3 cups sifted flour (7 dl)
2 tablespoons sugar
3 eggs, separated
6 tablespoons melted butter
1/2 teaspoon salt

Blinnis are made with a yeast dough, so the first thing I did was warm two cups of milk in the microwave.  Make sure and stir the milk before putting the yeast in it, and don't let it get more than lukewarm or it will kill the yeast and the dough won't rise.  If you don't warm the milk, the dough will take a really long time to rise.  In my microwave it took two minutes, but microwaves vary a lot.


Stir the yeast and sugar into the warm milk.


Sift the flour before measuring it, otherwise the amounts will be wrong.  My sifter broke a long time ago, but I use a mesh strainer over a bowl and just shake it a bit, it works great!


Add one cup (2 1/3 dl) of the flour to the warm milk and mix it well.  The flour didn't dissolve well when I stirred it with a spoon, so I used a whisk.  At this point, cover the batter and put it in a warm spot to rise for about half an hour or until it doubles in volume.


After the batter rises, separate the eggs, yolks from whites.  Break up the yolks with a fork or whisk, and stir them into the batter.  


Add the rest of the flour (2 cups or 4.75 dl) and stir well.  Once again, I used the whisk to eliminate any lumps.  Add the salt and melted butter, mixing well.


Beat the egg whites until they are stiff.


Fold the egg whites gently into the batter, using a spatula to scrape down the sides.  Do not over mix at this point.  

Cover the dough again and let it rise in a warm place for another half hour.


After the dough has risen to about double, it is time to cook the blinis.  I put a little butter in each indentation before putting in about 2 tablespoons of batter.  If you don't have a pan like this, you could make them free form on any griddle but they may not be as perfectly round.  You could place a greased round cookie cutter on the griddle to shape the dough.  


The dough bubbled up nicely when it was time to flip the blinis.  I found that the new pan was so heavy and conducted heat so well that I could turn the heat off to cook the pancakes once it heated up.  I really miss having a gas stove where I could regulate the heat better!


We really enjoyed eating these savory little pancakes!  We put a dollop of sour cream and some lumpfish roe (from Ikea) on them.  The kids liked putting cold smoked salmon on theirs, and we added a few capers.  I doubt capers are very traditional, but the salty taste was really good.  

I made an extra batch of the dough because I was afraid we wouldn't have enough for my hungry teenagers, but one batch was almost enough.  If you want to see what I did with the extra batter, check out the post here.

Tuesday, February 1, 2011

Cured salmon--Gravlax part 2


Today we ate the gravlax that I cured a couple of weeks ago, it was delicious!  Much better than the cold smoked salmon that we usually buy at the grocery.  The only comment that I got that might be negative was from my husband.  He said, "This isn't raw salmon, is it?"  The kids and I loved it, although we did end up eating it in a very un-scandinavian way, with bagels, cream cheese, thin sliced sweet onions, and capers!

I've had the cured salmon in the middle of my chest freezer for a couple of weeks.  According to several internet sources, it is advisable to freeze fresh salmon for at least 7 days at 10 degrees Fahrenheit to eliminate any parasites.  You can also buy frozen salmon and then you don't have to freeze it, most refrigerator freezers do not get cold enough.  Next time I would probably buy pre-frozen salmon.

Slicing the salmon was much easier because I used a very sharp boning knife and sliced it while it was slightly frozen.  I sliced it diagonally in thin slices off of the skin.

Thursday, January 13, 2011

Fish soup made with salmon--kalakeitto (lohikeitto)


My salmon was curing in the refrigerator, but the kids wanted to eat some immediately.  All I had left was the bones and head, so we made some salmon soup. A friend just reminded me that I really need to give my host mom, Sirkka, some credit here, she makes the most incredible salmon soup!

First, I boiled the salmon in about 6 cups of water for half an hour to make broth.  Then I strained out the fish and bones.  I'll leave this picture of the fish smaller, it isn't the most appetizing...


Into the strained broth, I added a couple of cubed potatoes and boiled them for 15 minutes until they softened.  Then I put in some chopped dill and added about half a cup of light cream (I could have used a cup of whole milk instead, but this is what I had in the refrigerator).  I pulled as much fish off of the bones as possible and added it back to the soup, it would have been good if I had reserved some chunks of fish to add at this point, but I didn't have any left.  After salting to taste and adding a little white pepper, I simmered it for 10 minutes (be careful that the soup doesn't boil after you have added the milk or cream, otherwise it will separate).  The kids loved it!  The youngest kept wondering if he could find the eyeball, maybe it would bring good luck like the almond in the rice porridge at Christmas!

Cured Salmon--Gravlax--Graavilohi, first post


We really were lucky yesterday, with my morning coffee I read that one of the local stores had a very fresh shipment of whole salmon for $3.99 a pound.  I rushed over and joined the line at the fish counter.  They opened ice chest after ice chest as I waited, but I finally got my prize--actually two of them, one for now and one for the freezer.  The fish were cleaned and scaled, beautiful!

Since it is so rare for Chicagoland to find such fresh fish, I decided to fresh cure it.  You'll have to excuse my poor fillet job--I definitely need more practice.

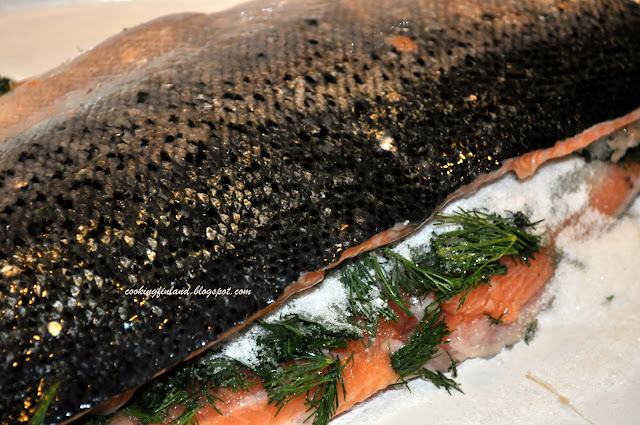
First, I cut off the head and filleted the salmon, then covered the bottom half in chopped fresh dill like this:


Next, I mixed together 1/2 cup salt and 1/2 cup sugar, with a tablespoon of white pepper and spread this over the dill.  It was a little difficult to find a pan large enough for this project, but one of my pyrex casseroles seemed to work.  Make sure the pan you use is deep enough--a LOT of liquid will come out of the fish.


The other half of the salmon went on top, then I covered the whole thing with foil.


Next, I found a heavy platter that fit down into the casserole, and weighted it down more with cans.  The foil is up a little in this photo, I fixed it before putting the whole thing in the refrigerator.


I took the fish out this morning and marinated it in the liquid that has accumulated, then flipped it over, reassembled the weights, and put it back in the refrigerator.  I will keep doing this every twelve hours for two days.  We can't wait to eat it!  In the meantime, I made fish soup with the bones and the meat that was on them.

Update:
I've been doing a little more research on the process, and it is recommended that the fish be frozen for three days either before or after curing to kill any parasites, and a lot of sites recommend curing for only one day.  Guess we'll be waiting a little longer!  Another interesting idea that I found is adding smoke flavoring to the curing fish.  This sounds really good.

Wednesday, January 5, 2011

Baked Salmon with cream--Lohi uunissa

 My family loves salmon, and we were lucky enough to find this large Norwegian salmon fillet.  I didn't really use a recipe this time, but I checked a lot of Finnish websites about baking salmon.  First, I used a little non-stick cooking spray, you could also butter the dish, and preheated the oven to 400 Fahreneheit (200 C).  I put the fillet in the pan, this one was skinless, but it should be skin side down if there is skin.  Then I squeezed the juice of one lime on it, I would have used lemon if I had had one.


Sliced onions are delicious on the top, but can be left out if you don't like them.  I had an open bag of baby carrots, so I put them on the side, they didn't get completely soft, but that is how my family likes them.  You could pre-boil the carrots if you want them softer.  Next, I sprinkled it liberally with salt and ground pepper, then poured in about a quarter-cup of cream, more would have probably been even better, but we were trying to keep the dish healthy.

Fresh dill sprigs topped off the salmon, then into the oven to bake for about 20-25 minutes, be careful not to overcook or the fish will be dry!  We ate it with boiled potatoes and a leaf lettuce salad.  It was excellent!